Ride With GPS (RWG) is a website where you can create your own bicycle routes. The "starter" membership on RWG is free, and most of what you need is included with the starter membership. One feature that requires the paid "basic" membership is PDF Cue Sheets. However with the Cue Sheet Generator you can create more powerful Cue Sheets than you can with the paid RWG membership!
Once created and saved (with public access in the "who can see it" field), then you can create a great looking cue sheet by entering the route number into the Cue Sheet Generator screen. The route number can be easily found by looking at the URL when you have the ride open for view or edit. For example, the URL will look like this: http://ridewithgps.com/routes/11026529
There is extensive help on the Ride With GPS website and you are encouraged to refer to that for "how to" information for creating a route. However, below are a few tips that will allow you to take full advantage of the features built into this custom Cue Sheet Generator.
Table of Contents:
- Custom Cues Overview
- Stop Signs, Traffic Lights and Crossings
- Special Cue for Ferry
- Danger, food, Water, Generic, First Aid, Valley or Sprint
- Climb Starts and Ends
- Points of Interest
- Printing Parameters/Options
- Designating Trails and Gravel Segments on the Map
Custom Cues Overview
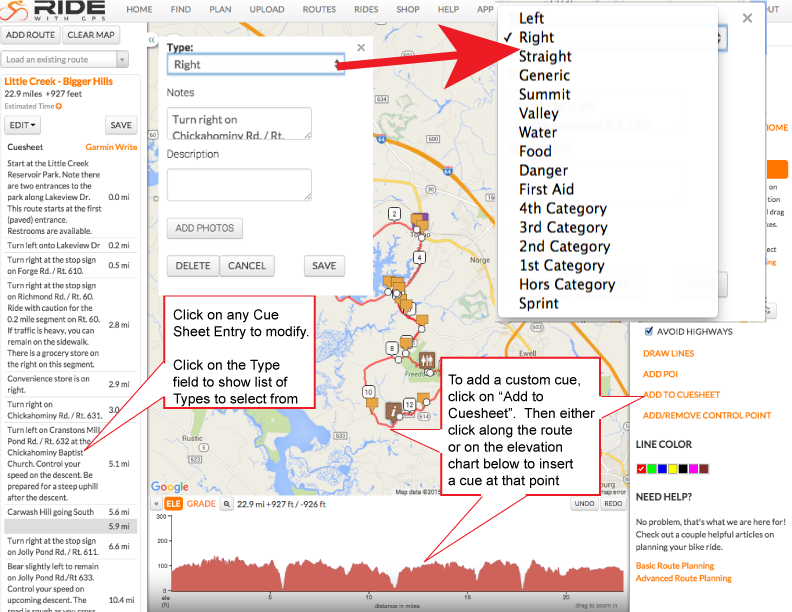
Firstly, you should get comfortable with creating custom cues in RWG. Whenever you map out a route, the RWG website automatically creates cue sheet entries for all turns. You can see these cue sheet entries on the left side of the screen when in Edit mode.
Click on the cue sheet entry to update and customize. You can click on either the entry on the left or the cue sheet entry icon on the map to bring it up to edit.
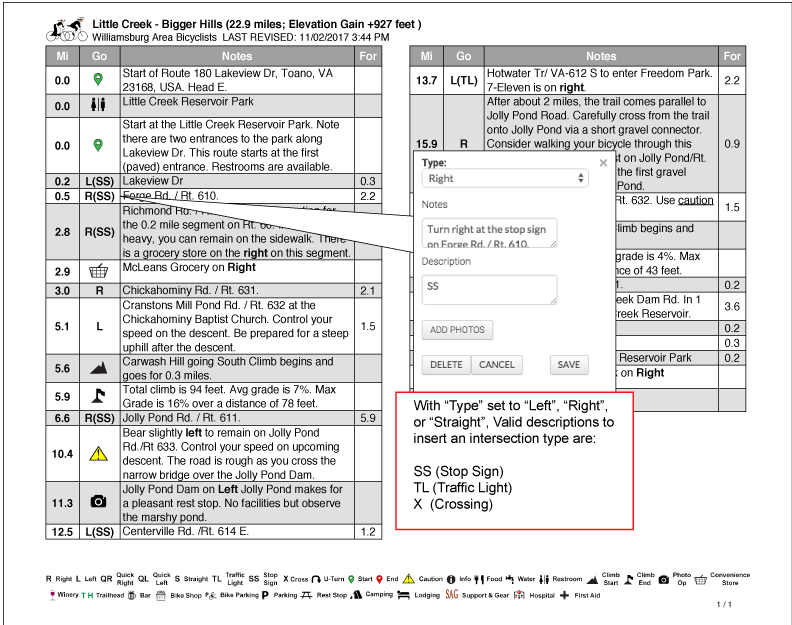
These cue sheet entries consist of the following data elements:
- Type: This is a "drop down" field so you are limited to the following choices:
- Left
- Right
- Straight
- Generic
- Summit
- Valley
- Water
- Food
- Danger
- First Aid
- 4th Category
- 3rd Category
- 2nd Category
- 1st Category
- Hors Category
- Sprint
- Notes: Normally includes the turn direction (such as "turn right on") plus the Road Number and/or Road/Street Name. By default RWG inserts the Road Number, but often omits the Road/Street Name, so a good practice is to update this field to include the Road Name. For example instead of the default "Turn right onto VA-618", you might want to change it to "Turn right onto Adkins Rd/VA-618
- Description: Initially blank but you can enter additional data in this field. This Description Field is used by the Cue Sheet Generator to insert custom graphics or abbreviations in the Cue Sheet as explained below.
In addition, you can insert a cue sheet entry anywhere along the route by selecting "Add to Cue Sheet" on the right hand side of the screen while in "Edit" mode, and then clicking on the route at the point to add the entry. Alternatively you can click along the elevation map on the bottom of the screen to add the cue sheet entry. This is especially useful when marking climb starts and summits. This is shown on the screen shot above.
Following are the special cue sheet features of this generator and how to take advantage of them:
Stop Signs, Traffic Lights and Crossings.
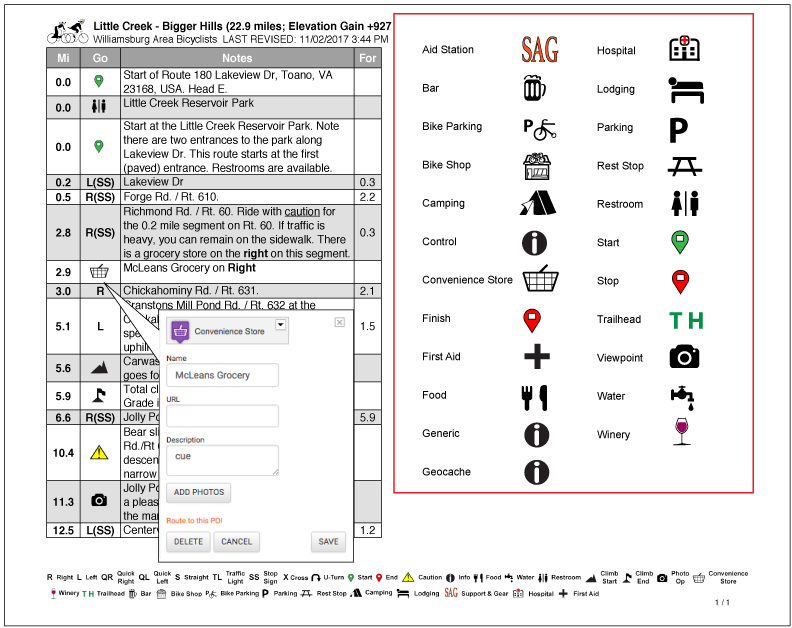
To show that there is a Stop Sign (SS), Traffic Light (TL), Tee (T) or Crossing (X) at an intersection, simply enter SS, TL, T or X in the description field for any cue sheet entry. This will automatically insert (SS), (TL), (T) or (X) in the Go column.
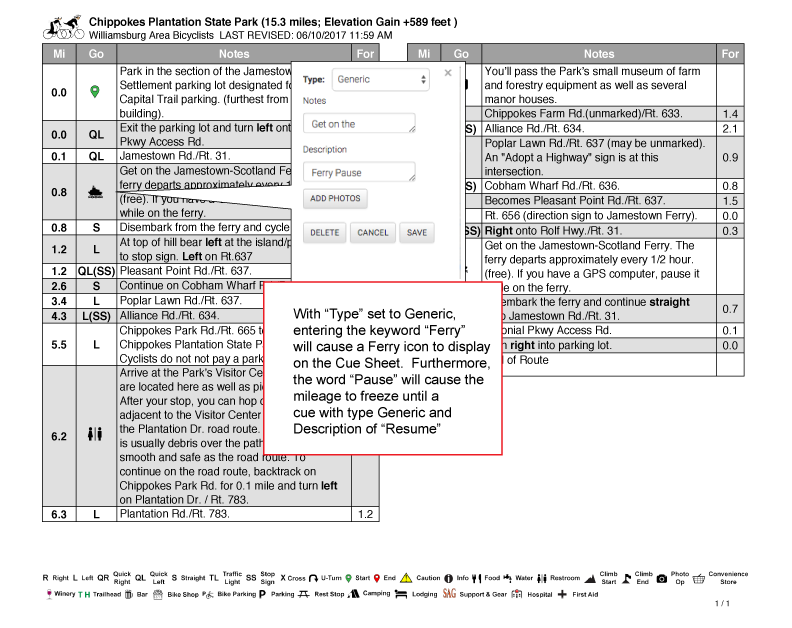
Special Cue for Ferry.
To show the graphic icon for the Ferry, enter "Ferry" in the description field for a cue sheet entry of Type "Generic". NOTE: furthermore, if you enter "Pause" in any Cue Sheet entry in the Description field, the accumulated distance will be frozen until a Cue Sheet entry with the word "Resume" in the description field. This was specifically designed to use on Ferry crossings. So at the point in the route where the ride embarks on the ferry, enter "Ferry Pause" in the description field. Then at the point in the route where the ride disembarks, enter "Resume" in the description field. This will result in the distance traveled on the ferry NOT being included.
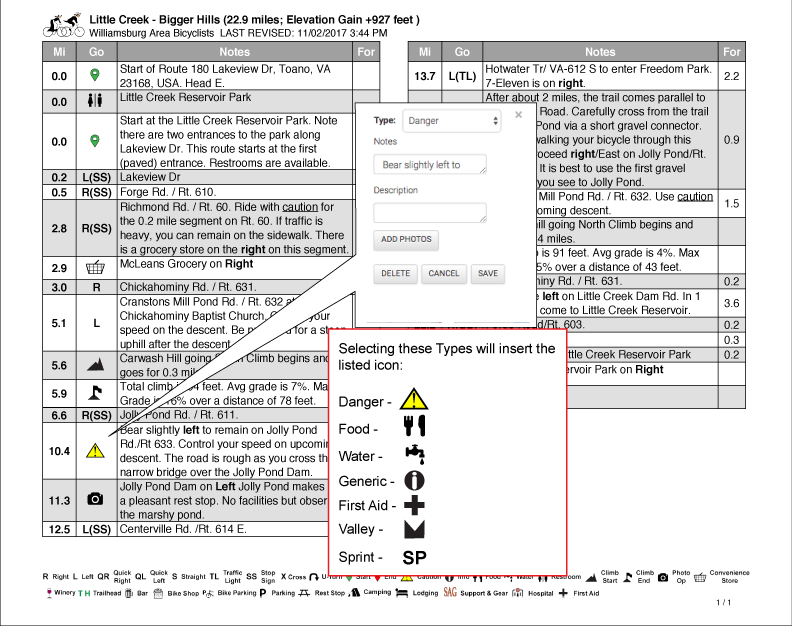
Danger, Food, Water, Generic, First Aid, Valley or Sprint.
To show the graphic icons associated with these items, select the associated Type on the cue sheet entry as shown below. NOTE: If the Type is Generic and the Description contains "Ferry" then the associated icon will be shown as described above. If the Description field is blank or contains other text, then the "Info" icon as shown below will be displayed.
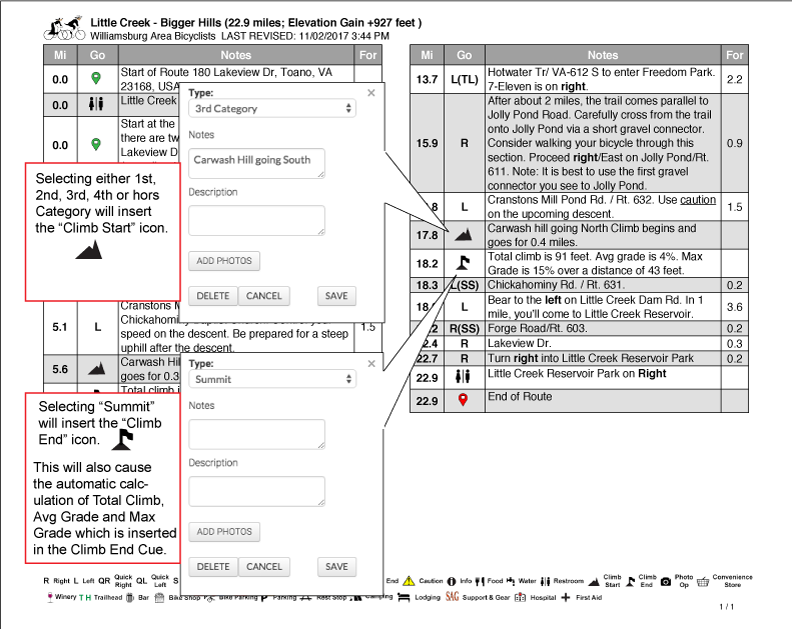
Climb Starts and Ends.
To show the climb start graphic icon, select Type of either "1st Category", "2nd Category", "3rd Category", "4th Category" or "Hors Category". It doesn't matter which category climb you select, they are all treated equally to mark the beginning of a climb. To show the climb end icon, select "Summit" in the Type field. NOTE: This cue sheet generator will AUTOMATICALLY calculate the total climb, average grade %, max grade % and ground distance traveled at that max grade. This information will be inserted in the cue sheet "Notes" column on the entry corresponding to the climb end (summit).
Points of Interest
Ride With GPS provides a way to add points of interest (POIs) to your routes. A cue sheet entry related to the POI can be inserted by including the word "cue" in the beginning of the description as shown below.
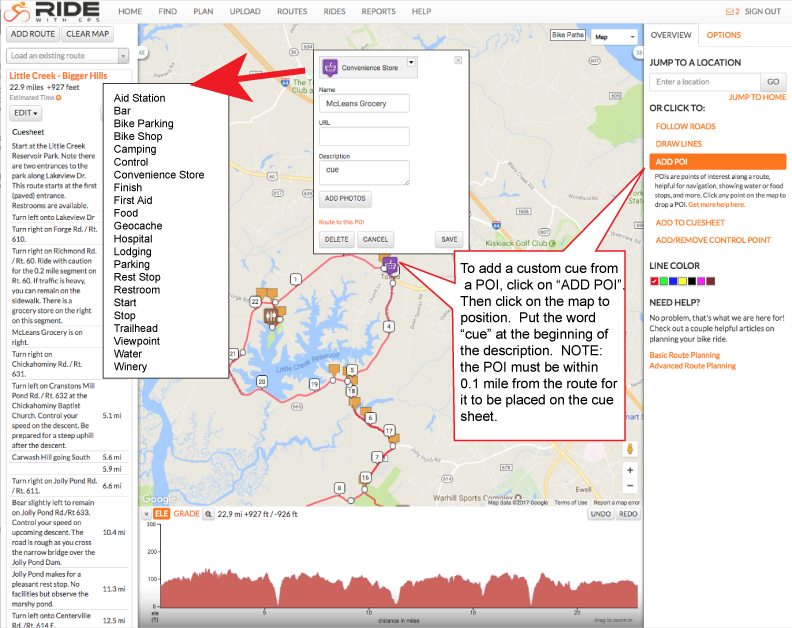
These POIs are not necessarily right along the route so it may or may not be something appropriate to include on a Cue Sheet. Therefore cue sheet entries are only included on the Cue Sheet if TWO conditions are met: 1) The word "cue" is at the beginning of the description and 2) the POI is within 0.1 mile from your actual route.
The following parameters can be selected when generating a Cue Sheet:
- Font Family
- Times-Roman (Regular, Bold, Italic or Bold-Italic)
- Helvetica (Regular, Bold, Oblique)
- Courier (Regular, Bold, Oblique and Bold-Oblique)
- Font Size (6 through 14)
- Page Layout
- 2 Blocks X 2 Columns - will produce a Cue Sheet that is meant to be folded four-ways for convenient use on a bicycle. Best to use a Landscape Page Orientation with this Layout.
- 2 Columns - will produce a Cue Sheet with two vertical columns that could be folded two-ways. Best to use Portrait Page Orientation with this Layout.
- 1 Column - will produce a Cue Sheet with one column taking the entire width of the page. Not convenient for taking on a bicycle.
- Style
- Verbose - will copy the Notes information from Ride With GPS into the Cue Sheet without alteration.
- Condensed - will abbreviate and remove duplicate information in the Notes Information. For example "Turn Right on" will be eliminated because the "R" indicator would already be in the first column, making that redundant. Also, common terminology will be abbreviated such as SS will be substituted for Stop Sign.
- Paper Size
- Letter - common 8 1/2" by 11"
- A4 - not commonly used on the US
- Legal - 8 1/2" by 14"
- Page Orientation
- Landscape
- Portrait
- Units
- Imperial - information will be displayed in miles and feet.
- Metric - information will be displayed in KM and meters.
- Page Heading
- If included, this will print on the top of the Cue Sheet. The intent is to include information that may be only relevant for this printing of the Cue Sheet, such as the name and phone number of the ride leader.
- Include Description
- If checked, the description entered into Ride With GPS when the route is saved will be printed on the top of the Cue Sheet. Since this takes up space on the Cue Sheet, you may want to omit it.
- Include Route Number
- If checked, the Ride With GPS Route number will be included in the heading of the Cue Sheet.
Designating Trails and Gravel Segments on the Map
The route on the map is normally designated in Red. But you can further designate sections on the route that are on a trail or on a non-paved (gravel) roadway. Trails will be shown in Green and non-Paved/Gravel segments in Blue. See below example:
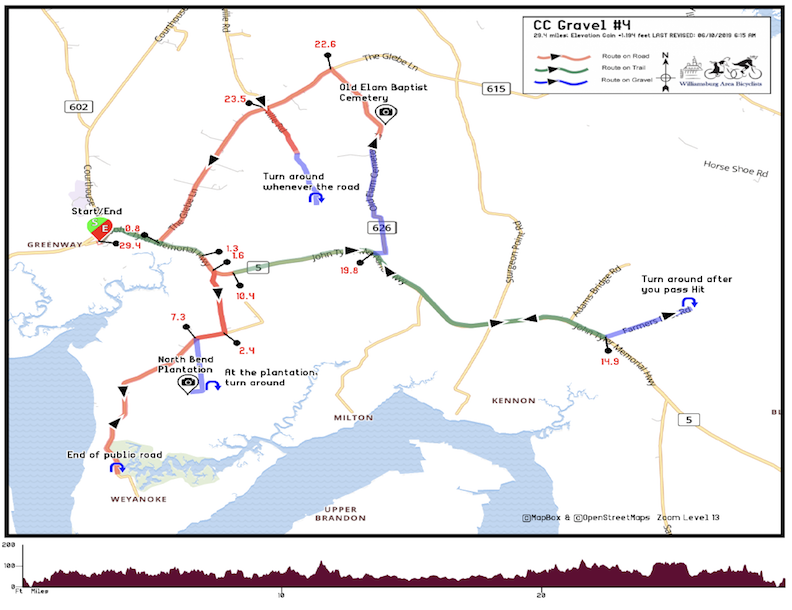
Just add the following to the description field of any custom cue: (the second letter stands for "embark" or "disembark")
{TE} - Trail beginning
{TD} - Trail ending
{GE} - Gravel beginning
{GD} - Gravel ending
If you have any questions about the Cue Sheet Generator, please contact webmaster@wabonline.org